Jul 31

CASE Study Challenge #202

This week at CASE Study marks the end of the month of inspiration from Shari Carroll. Fret not, we got to have an extra fifth week this month, which happens only a couple of times each year. So enjoy the bonus, pull out those supplies and join us!

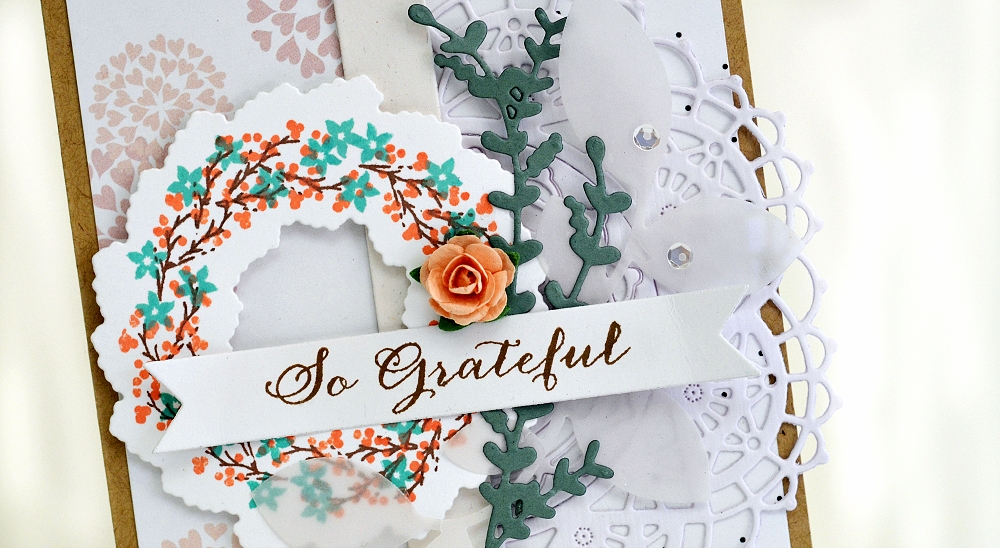
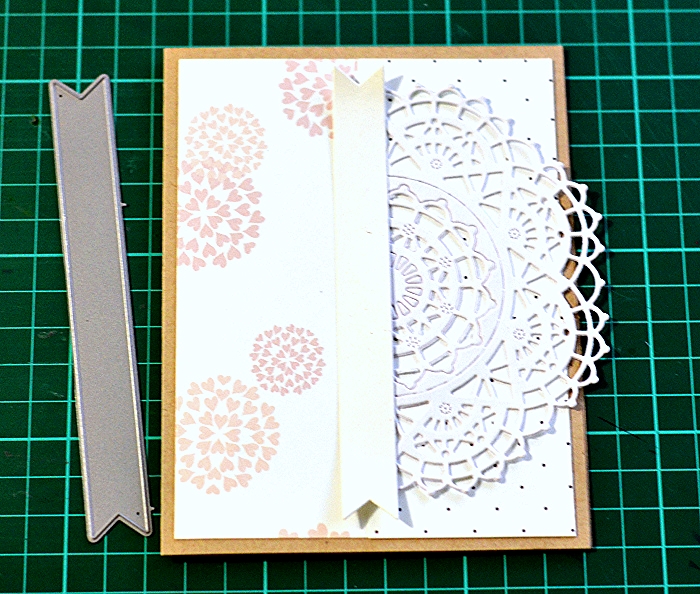
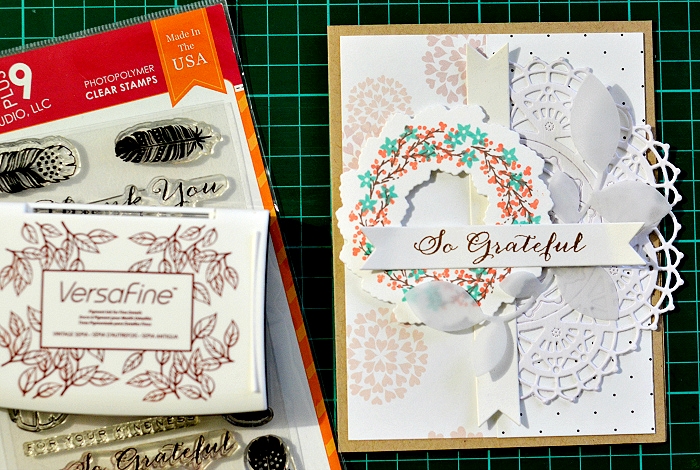
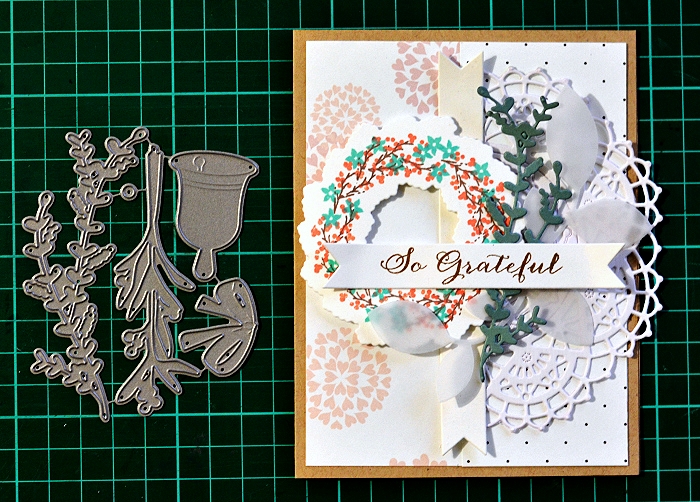
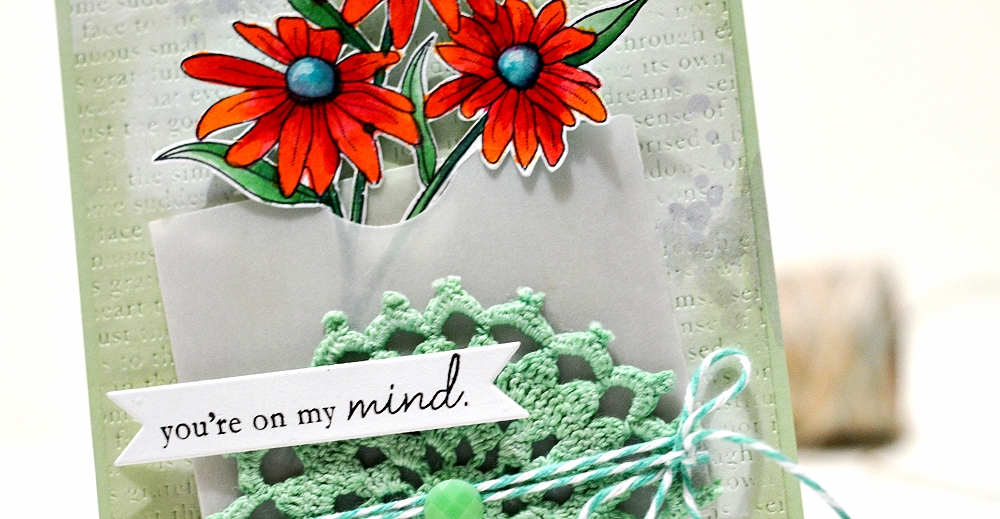
It might be the first card of Shari I ever saw, as well as mentally noted as awesome. Big, bold flower against the intricate kraft background? Oh yes, any time! I chose to abandon the tone-on-tone stamping because it didn’t suit my idea, but I did use kraft (Simon Says Khaki cardstock) and a bold pop of colour which I put together with the help of Copics and the awesome Lace Up set from Altenew. Oh, and a Copic Opaque White pigment paint. Hello, fun and easy!

In case you dig the look of the colour combo, the markers I used are RV13, RV29, BG53 & BV29.

Check out the blogs below for the Design Team’s takes on the challenge, or visit CASE Study for the full reveal!

Shari Carroll- July Muse
Tenia Nelson, Amy Tsuruta - July Guest Designers
Amy Wanford (Aimes) (on a Summer break)
Anika Lerche

Anja Curvers
Anna Kossakovskaya (Umichka)

Gayatri Murali
Jill Foster
Jeanne Jachna
Julia Stainton
Michelle Williams
Silke Ledlow (on a Summer break)
Tasnim Ahmed


Jul 30

Bold & graphic with Penny Black

Hi there! A quick appearance today with the card I made for Penny Black feature on the Scrapbook & Cards Today blog. They highlight the awesome new Pocket Treasures Release (which I happen to LOVE!) and here’s what I made:

I used the By The Numbers cover plate which I cut in light grey cardstock (making use of the negative space) and in aqua cardstock which I used the positive of to fit snugly in the ‘window’. I also cut one in yellow, trimmed the number 23 to represent the age and adhered directly over the positive die cut.
The speech bubble was die cut using the A Pocket Full die and stamped with a coordinating stamp from the Let’s Chat set.
I finished the card with a couple of wood dots. I like this card and the fact that it’s personalized 🙂

See the rest of the creations featuring the new release, on the Scrapbook & Cards Today blog. Cheers!

ETA: The feature launches on the 31st and 1st instead, I’m sorry for the confusion!


Jul 28

Sketchbook Saturday Challenge #127 meets Anatomy of Layers

Hello, has the week started well for you? It’s the same old song that I’m going to sing today, apologizing for the delay of the new sketch. We had some lovely time with the rellies from abroad during the weekend, and time slipped me completely. The good part is that I photographed the process of making my sample card so you’ve got yourselves another installment of Anatomy of Layers 🙂

There are many ways in which you can interpret the cluster on the sketch - as you can see I combined stamping and a whole lotta die cutting. And an old fashioned mulberry rose… has someone said that they’ve gone out of style?? *wink*

My apologies for the poor quality of the photos. Not only photographing the process on the dark mat, right where the action is, doesn’t yield the most aesthetic results, but doing so in the lamp light late at night is not too good of an idea either. I figured that since it’s a good opportunity to share an extra content with you, it’s still better to do so than refrain because of unfavourable conditions 🙂

So I started by combining two designs from Glitz Design Carpe Diem 6×6 pad, on a WPlus9 Kraft card base.

I die cut the Nautical Wheeler Doily from Cheery Lynn, cut in half and adhered to the card. Then I used the biggest banner from Banner Trio Die from WPlus9 to add the vertical element. Note: I used a variety of white and cream cardstock scraps to die cut the elements in. You can see the variation in shade on the subsequent photos. I’m not a fan of predictability and all about frugal, so if it means using up those scraps and giving the card a fun twist while doing so, I’m there.

I used the Woodland Wreaths stamp set with coordinating die (WPlus9) to create the wreath. I stamped with Pure Color inks.

I mounted the wreath on the card and clustered some vellum leaves on its side, which I die cut with Simon Says Clustered Leaves die.

Then I die cut another banner in smaller size and stamped the sentiment from Fanciful Feathers. I placed the banner across the card using dimensional tape, like I did for the wreath, and covering the unsightly parts of the clustered leaves.

Next I used my favourite, realistic branch die from Under The Mistletoe die set, to add a deep teal element to the card which compliments the flowers on the wreath. The choice of the colour to go with pink & peach on my card, came from the paper pad I used but I ended up adding it in other ways myself.

Lastly, I added a few clear sequins and a rose, creating a bit of an extra ‘oomph’. Voila!

Do you like it? I do! I hope you enjoyed the tutorial and of course I’d be happy if you tried the sketch yourselves! If you do, don’t forget to link it up in the widget below so that I can pop in for a look 🙂

***************************************************************************

If you would like to play along:

- You’re kindly asked to save the sketch image onto your computer first, and if you make a card based on it, please link back to this post.
- Share the link to your creation via the Inlinkz widget below, so that I can come and check it out!
Perks:
- A new sketch is posted every other Saturday night (ideally but I might be late at times), and the link widget is open for two weeks. However, you’re welcome to play any time! Just leave a link in the comments section and I’ll pop in to see it.
- Every now and then, I’ll be inviting one person who uses my sketch, to join me for the next one!


Jul 25

Papertrey Ink July 2014 Blog Hop

OK guys, you have to forgive me another quick post. Truth be told, I should be sleeping already - early morning tomorrow. Ack! I’m sending this post live now and I’ll link it up later.
It was a last minute decision to join in the PTI July Blog Hop Challenge, upon checking out the inspiration photo (below) which happens to be one of my favourite Pinterest finds. I couldn’t pass on the mint either 🙂

I chose some oldies to work with, Friendship Jar Fillers (flower bunch) and Blooming Button Bits (sentiment only). I see everyone getting rid of their old PTI stash these days, I don’t think I could part with any of my PTI sets… not to mention that most of my collection is way old anyway :/

I created a pocket from vellum (with a Penny Black die, all supplies listed at the end of the post), wrapped a thrifted doily around it, some twine and added an enamel dot to the center of the doily. The flowers were watercoloured using Peerless Watercolors. The background was created by embossing with the PTI impression plate and then swiping some white pigment ink and adding a few splatters of Silver Glimmer Mist here and there.

Less than perfect lighting as well on these photos, only a lousy ceiling light to accompany me at night. I have to get by with what I’ve got! See you later 🙂


Jul 24

CASE Study Challenge #201

Hi there, just a quick post today because I’m running late. A new challenge at CASE Study has just launched, with the inspiration from Shari Carroll below. It’s a relatively old piece from her blog but I dig it so much!

I don’t know how I went so much astray with my card… I got immersed in the process, having too much fun. Eeek! None the less it turned out to be one of my favourite pieces to date but I can honestly tell you that the correlation between some of the elements I only acknowledged after I photographed the card. Gasp! Does this sentiment piece really look like a sun?? LOL You get the picture 😉

Check out the blogs below for the Design Team’s takes on the challenge, or visit CASE Study for the full reveal!

Shari Carroll- July Muse
Tenia Nelson, Amy Tsuruta - July Guest Designers
Amy Wanford (Aimes) (on a Summer break)
Anika Lerche

Anja Curvers
Anna Kossakovskaya (Umichka)

Gayatri Murali
Jill Foster
Jeanne Jachna
Julia Stainton
Michelle Williams
Silke Ledlow (on a Summer break)
Tasnim Ahmed


Jul 23

Custom made floral papers

I was telling my FB peeps a few days ago, how much I’d love to see a brand new, two-three step stamp set on the market, which would allow me to create vintage-style floral arrangements full of old English roses, wild flowers and whatnot. Then we started exchanging thoughts on the existing sets which allow us to do just that and it led me to wondering how the heck it happened that I never used those teeny tiny roses in The Sweet Life (PTI), to create a custom background. Intimidation, I suppose - because they truly are small and that yields a lot of stamping. But hey, it’s WORTH it, guys 🙂

I stamped those small roses all over the PTI Rustic White card, and filled the gaps with the equally small flowers from WPlus9 Fresh Cut Florals & leaves from Folk Art Florals. Then I covered the card with a layer of vellum to mute down the colours, but left a rim around the card for an interesting peek-out accent.
For the focal point, I die cut and stamped the trio of large roses from The Sweet Life, plus the foliage, and stamped the sentiment from WPlus9 Hand Lettered Hello directly on vellum.

I based this card on this CTS#85 layout:

I was still feeling creative after I finished with this one, and I attempted one more floral background - this time with my recent favourite (and not mine only, seeing everyone’s enthusiasm!), Altenew‘s Painted Flowers. I also multi-stamped them with a variety of inks including white, which gave the pattern a fresh, crisp feel. This time I used a light gray cardstock, Simon Says Stamp Fog, which is seriously so, SO yummy I can hardly stand it.
See that subtle texture on the surface of the paper? This is what gets me every time. I learnt that while many people look out for for the smoothest cardstock, I tend to appreciate the natural look that gives off the feel of a hand-made paper. Delish!

I decorated the top part of the card with some washi tape, a strip of cardstock in a matching yellow colour, the sentiment assembled with the help of Simon Says Stamp Hello You set, and a length of Hemptique twine. I also added some fake splatters from WPlus9 Ink Splats, also with white ink, in between the flowers.

This card in turn, is inspired by both the photo and the layout in the current Fusion challenge.

That’s all for today, stay warm fellow Aussies (brrrr!) and see you tomorrow!

Hello card


You card


Related Posts Plugin for WordPress, Blogger...