Dec 09

WPlus9 December Release - Winter Pals & Miss You Lots

It’s been quite a while and I need to apologize for not having been able to join the rest of the Design Team in featuring the great new WPlus9 product during the release days. As you know, my mad crafting days are on hold and I’m taking the time to enjoy my girls and concentrate on the daily life instead. Of course it doesn’t mean that I don’t itch to stamp, it just doesn’t happen as often as it used to. However, I’m back today with a couple of cards and I hope you’ll enjoy them as much as I did having them made :)

I was in the mood for some Copic colouring, especially that I was super excited about the image that Dawn drew, the moment I laid my eyes on it. I’m talking about the Miss You Lots stamp set, with the insanely gorgeous, vintage-looking girl that I just adore. I had a soft spot for this kind of imagery since childhood and I remember trying to recreate a few images during my young drawing spurs. Colouring this cutie was like a blast from the past.

The girl comes with a matching die but I stamped it directly on the panel and coloured entirely with Copic markers.
dress: BG78, 72, 11
shirt, socks: C5, 3, 1
skin: E00, 11, 21, R11
hair: E41, 43, 44
shoes, cat: E81, 84, 89
ground: YG91, 93, 95, G40, BG000

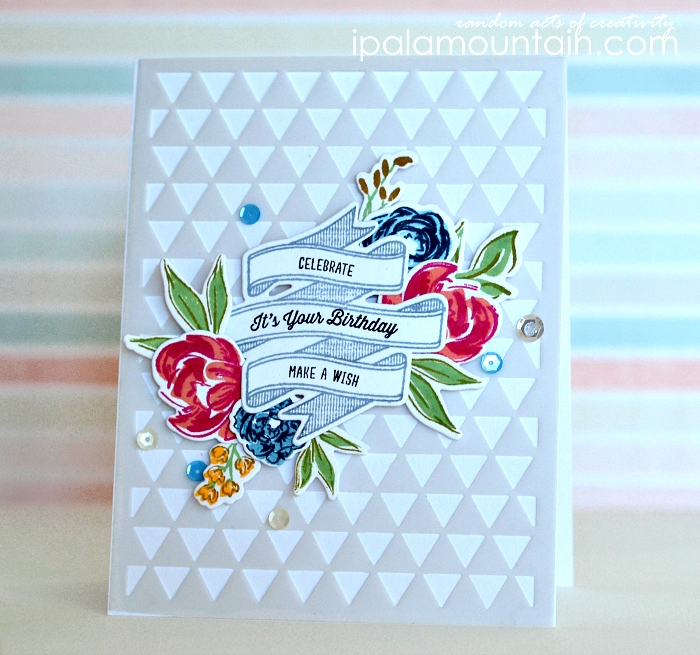
After stamping the sentiment and adding a few faux splats using the Ink Splats and Dream Believer stamp sets, I added a strip of washi tape to the panel and mounted it on the card front with dimensional tape. Finally I cut my favourite sprigs from Under The Mistletoe Designer Dies from vellum, and attached them to the panel using a mini clothespin. I added drops of glue to the back of the sprigs in a few places, to prevent them from moving and/or tearing.

…………………………………………………………………………………………………………….

The other card I want to show you, features the cute new Winter Pals Clear Stamps. I used the matching dies to cut them out and coloured them with Copics. I added dots of white pen to the owl’s belly.

For the background, I white embossed some snowflakes from Snowflake Backdrops Clear Stamps, sponged Broken China Distress Ink over and added a few tiny, stamped stars from Little Bits set. I never got around to using the latter much (YET!) but it’s insanely handy. A sure staple in my stash!

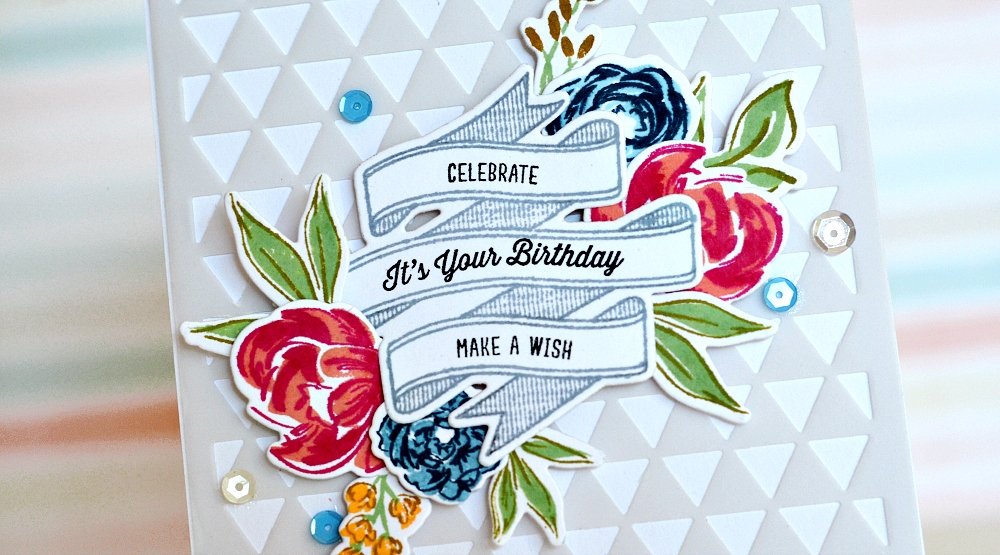
The finishing touches are a strip of washi tape (again) and a sentiment stamped on a banner but with Banner Trio Designer Dies. These banners are quite possibly one of the most used dies in the history of my crafting. Understated & just the right size.

So here they are, my crafty friends! Thanks for popping in for a visit, I truly hope that I’ll be able to see you again this year! lol
The WPlus9 December Release is now available for purchase in the WPlus9 Online Store, as well as in Simon Says Stamp store. Enjoy the shopping!

Miss You card


Winter Wishes card


Nov 17

Sing anyway

Some cards are harder to make than other. I’ve always had mixed feelings about sympathy cards because I felt those of the hardest words to share with the other person, don’t necessarily need dressing up. The tragedy that made this particular card happen affects me personally and the recipient is very dear to my heart. I felt the need to create for her, and include a message inside that would be well composed, saying everything I want to say without struggling to find the correct words in a face-to-face conversation. I created it having a very dear person in mind who is here no more, and it was beautifully cathartic.

I had a solid idea in my mind and some of the old stamps I have helped me execute it. One of them is from a company that shut its doors a year ago, There She Goes. I used to design for them. The set is called Angel Mail and the sentiment I used comes with it. I kept quite a few of their sets and this one is especially dear to me as the sentiments are truly unique and meaningful. I really wanted one that would be more personal than just a dry ‘with sympathy’.

The other stamps used here are Birch Branch Print from Memory Box (foliage) and Antique Engravings from Hero Arts. Only the latter can be found in the SSS store (here), and it’s one of my all-time favourites.

I created the scene by masking off a circle and creating a sun with Distress Inks first. I sprinkled on some water for a textured look. Then I stamped the branch and the bird and coloured the latter with Copics. Finally I stamped the sentiment. I used a light grey ink so that this rather large stamp doesn’t overwhelm the composition.


Nov 13

Pretty peonies

I haven’t checked in for another long week and while there’s been plenty of valid reasons, I’ve been itching to stamp. This time just as much a creative therapy as a source of relaxation, because a recent death in the family shook my world quite hard. Yet again crafting proved a soothing distraction.

I made a card in my favourite style as of late, an airy floral arrangement with textured bits packed in tightly. I reached for Pretty Peonies and Pretty Little Peonies stamp sets (WPlus9), both endlessly waiting for me to give them the love they fully deserve. I picked a few flowers and leaves from both sets, and stamped them on the corresponding die cut pieces (found here and here), with a variety of WPlus9 Pure Color inks.
I also die cut and stamped the banner from one of my older favourites, Written On Ribbon (stamps and corresponding die here), arranging everything later in a cluster.

The only non-WPlus9 element (apart from the sequins) is a vellum background piece, die cut with a Hero Arts Triangle Background die. I’ve been a tad obsessed with vellum which I’m sure you noticed :)


I had help in a form of inspiration here, the new Runway Inspired Challenge honoring Oscar de la Renta. I’m not a big fashion enthusiast but I wouldn’t mind taking any of the dresses picked by the DT home. The models look stunning as well, with understated make-up. But I digress. Here’s the inspiration for my card - the vellum is a bow toward of the sheer fabric, I only wish I had a large striped cover-up die so that I could follow the pattern more closely.

I also wanted to sneak in a card that I’m about to send for my parents’ impending anniversary. Good ole’ layers, as you know something I wouldn’t necessarily be doing any more but I enjoy it when I do :) Mum likes dainty cuts and feminine touches and I don’t mind as soon as it means that some of the lovelies I rarely pull out are put to a good use.

The patterned paper I used here is a gorgeous, shimmery bliss. I love it so much so that during the recent visit to a craft store I stumbled upon it by accident and had to have. I don’t even buy 12 x 12 sheets any more… but WHOA. The manufacturer is a local (?) low-key brand called Bella! (I know, how creative, hey?) so I’m sorry to anyone who may not have luck finding one one their own.

There is quite a few more locally sourced products here (flowers, doily, pearls, skeleton leaves) plus scraps of unnamed paper and cardstock utilized, so the product list is unfortunately limited. Nevertheless, I hope you enjoyed taking a peek at both cards. See you next time!

Birthday card


Congratulations card


Nov 06

25 Days of Christmas Tags Guestie

Hello, good to see you after a long-ish break! Today I’m pleased to join my talented friend Tracey McNeely for a Day #4 of 25 Days of Christmas Tags feature on her blog.

Along with the daily inspiration from the talented guests, Tracey offers prizes from:

  • Reverse Confetti
  • Clearly Besotted
  • CAS-ual Fridays
  • Neat and Tangled
  • Paper Smooches
  • Lawn Fawn

You put your name in the draw by leaving comments on Tracey’s blog (see her blog for the details), plus I’m offering you another chance to win, by leaving a comment on this blog post.

You have until midnight on November 26th to comment and on the 27th I’ll randomly draw one name and forward it to Tracey who will put it in the prize draw. The winners of the whole event will be announced on the 28th. Sounds good? :)

Here is my contribution! …a set of three tags I made for my personal use for Christmas, with a variety of new and older WPlus9 product.

They’re all made using the same colour scheme and similar techniques - a subtle two-tone sponging (the pink fades into shimmery silver which was hard to capture on camera) and lots of die-cutting in action. The techniques are pretty self-explanatory so I’ll let you enjoy the photos without boring you with the text 😉 See below for the individual shots and ‘lists of ingredients’.


See you again soon, good luck with the drawing!

Nov 01

Altenew winner

Popping in quickly to announce the winner of the two stamps sets of choice from the Altenew October release blog hop (post here).

craftingjess wrote:

Holy. My jaw just dropped on that silk screen card you created. ABSOLUTELY STUNNING!!! I am completely floored with your talent!!!

Thank you and congratulations, Jess! I emailed you. Thank you to all who left comments. Carry on! :)

Oct 31

WPlus9 medley

Hi guys, first of all thank you so much for the comments left for my Altenew Blog Hop post below. It’s not as much as the sheer multitude of them, but the thoughtfulness and the fact that so many took your time to leave meaningful feedback, means a lot to someone who knows first hand how much effort it takes to fit commenting in one’s busy life. Muchos gracias, amigos!

Thing is, the fun I’ve been having stamping lately plus your encouraging c0mments, gave me fuel to keep going and so I’m happy to say that I have two WPlus9 cards for you today. Let’s get straight to it.

This card below you would’ve seen a sneak peek of on my Instagram. I’ve been itching to colour the hummingbird from Flora & Fauna 2 and so I did, using my Peerless watercolours (turned out a quick job, nothing too spectacular in therms of colouring I’m afraid) and after having it die cut with a corresponding die. I paired the bird with the branches, die cut with Foliage Frame Die (separate branch only) and the tiny flowers from Birds & Branches Frame Die. The latter I watercoloured as well, channeling my inner Teamie Joni *wink*

I mounted the elements on the panel of SSS Woodgrain cardstock (good stuff) and added a sentiment sticker (My Mind’s Eye).

The second card features the new Twenty Fifteen Clear Stamps which I paired with Small Butterfly Frame Die. I wanted to achieve that spectacular double-stamped look that Laura Bassen so effortlessly creates on her cards - alas, my die cut is in retrospection too elaborate for the sleek look I was hoping for.

I stamped the three different sentiments on a piece of PTI Ocean Tides CS and again on the lightly textured white CS which was then die cut. It’s not an easy job trying to align the images, I had a few mishaps 😉 Everything was then mounted on a SSS Fog card and embellished with clear sequins and an extra butterfly.

Hope you enjoyed, cheers and until next time xx

I Love You More card


Twenty Fifteen card


Related Posts Plugin for WordPress, Blogger...