Dec 07
Hi there, lovelies! I’m burning the midnight oil severely, but I promised myself that I’ll get this post nailed tonight no matter what… I spent a great deal of time earlier today, moving Julka (my younger) to her own room (finally a bedroom of our own again, woo hoo!) but I got sucked in, as I would, for hours on end. So typical of me 😉 Anyway, I have a new sketch for you and although I still haven’t managed to prepare it early enough to manage a Guest, I do have an accompanying tutorial which I hope you’ll enjoy 
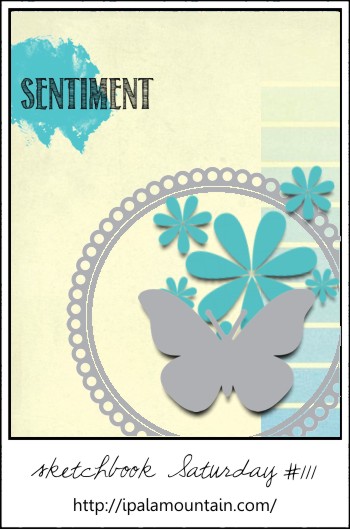
This particular sketch was triggered by Make It Monday #143: Modern Whimsy Style. If you know me a bit, you should well know that it’s a style that I reach for a lot - often with a bit of retro / vintage sneaked in like it happens here. Danielle’s style, who’s a host of the MIM is also one of my personal favourites (um, no surprise here) and I couldn’t wait to whip up something for the challenge.
I love my splatters and layers of elements and since I got a few request recently, to explain how I layer the elements on my cards, I thought it would be handy if I did just that.
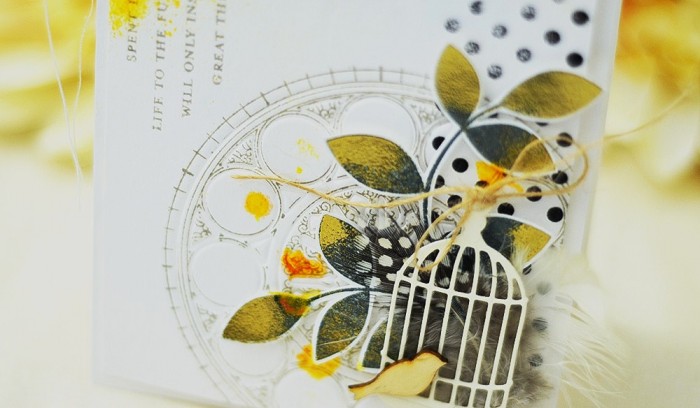
I started with a layer of white card, which I cut slightly smaller than my card base. I stamped the pattern from Polka Dot Basics in black ink. I inked the stamp unevenly on purpose.
Then I embossed the Clock Face die (I shared the instructions in a video tutorial a few days ago, here)
…and stamped the corresponding shape, from the Hands Of Time set, over the embossed shape. The images overlap and you won’t achieve an even impression, but again - it’s not the point here.
Then I added a splatter with Smooch Spritz, in the opposite corner. I’m now working on adding some balance to the design.
I clustered a few random number stamps, aiming to make them appear as if they’re spilling from above the splatter. This is adding movement to the picture.
On a separate piece of card, I stamped the leafy branch from Turning A New Leaf (still one of my favourites), with Ocean Tides ink. Then I dabbed Versamark on to the tops of the leaves only. I kept my ink pad at an angle, making sure the ink only goes where I want it to.
I stamped the Versamarked leaf again, directly on top of the image, and embossed it with gold.
I then cut the image out and mounted on dimensional squares, in the bottom corner. If you own the die, you could die cut it instead.
I initially wanted to add the sentiment on the banner or a piece of DP, over the branch but I decided that it’s too pretty to cover to such extent. Therefore I added it under the previously stamped numbers. I used grey ink (same as for the clock face) so that it doesn’t stand out so much and compete with the rest. See how I added an element of surprise, by stamping it vertically?
It still looked kinda bare to me afterwards, so I decided to add a bit more definition by sewing a couple of lines. I combined zig-zag with regular stitch.
To hide the stray bits of thread at the ends of the stitch, I flip the panel over and pull on the loose end until I see a loop coming through. I then grab and gently pull on that loop until I lace the whole of the stray tread underneath. In the same manner, if I want the ends show up and hang from my card (like I did to the other end), I do the same thing but in the opposite fashion - letting the “upper” thread bring the one underneath to the surface of the panel instead.
Once I was satisfied with the result, I moved back to the lower corner and began layering stuff on top of the clock face. First up, I glued two small feathers (local craft store find).
And lastly added a die cut bird cage, a wood veneer bird and a few more splatters of ink. I wanted drops this time so instead of spraying directly onto the card, I turned the tube upside down and pressed the nozzle half way down until I saw ink oozing through. Then I flicked it over the card. Note: I do my best to make the ink go where I want it to but it’s always a hit and miss thing 😉
***************************************************************************
If you would like to play along:
- You’re kindly asked to save the sketch image onto your computer first, and if you make a card based on it, please link back to this post.
- Share the link to your creation via the Inlinkz widget below, so that I can come and check it out!
- Share the link to your creation via the Inlinkz widget below, so that I can come and check it out!
Perks:
- A new sketch is posted every other Saturday night (9pm Australian EST, 6am American EST, and the link widget is open for two weeks. However, you’re welcome to play any time! Just leave a link in the comments section and I’ll pop in to see it.
- I’ll be inviting one person who uses my sketch, to join me for the next one! I’ll be also highlighting the entries that caught my eye, on my Facebook page.
- Every now and then, I will also invite an inky friend to join me as well, for an extra dose of inspiration.


absolutely stunning card - love it!!
You add so much fabulous detail to your cards. Thanks for the great photo tutorial. My favorite surprise element is the sentiment stamped sideways in the upper left corner. Way to think outside the box!
Amazing details, Chupa! I love the awesome photo tutorial. Very easy to follow. Thank you for sharing.
Gorgeous card! I love all of the detail. I can see we are going to learn a lot from you.
Wow stunning card Iwona. Love the elements you’ve combined. Must go and see what else you’ve been up to as it’s a long while since I visited
Your card is stunning. May have to case it.
Ang
This is gorgeous, Chupa!
Absolutely stunning Iwona! I love everything about your card! Thanks for the tutorial as well as the inspiration.
You are soooo creative, Chupa!! Love this!
As true work of art! Simply stunning!
This is a stunning piece and it’s great to see how the design developed step by step! All the little details are beautiful.
Beautiful card and I appreciated your description of the steps and rationale you used to make the card!
Wow, Chupa! This is amazing! I am blown away by your step-by-step process here. Fascinating reading!
Jaw dropping!
This is a work of art! Thank you soooooo much for the walkthrough. I always wonder how you build up your collage-style creations. I may dare to attempt it myself one day….! ;D
Oooh and PTI tweeted this too - easy to see why! <3
Gorgeous card Chupa! Love the way you embossed the leaves!
Just stunning - really, really love this!
Umm, Wowza!!! This is absolutely the most beautiful card I have ever seen!!! You rock this style!!
You are the Queen of Whimsy! Your color choices are so unique and the items you choose to layer always surprise and delight me!.
Seriously, an amazing card! Thanks so much for the tutorial - really is helpful~
Gorgeous card, fabulous photos and a really great tutorial too! Thank you
Absolutely gorgeous in every way!! Love the collage you created and the colors are fabulous!! I don’t use yellow much, but you have totally inspired me my friend!! You rocked the challenge!
wow! absolutely gorgeous card Chupa! stunning details and thanks so much for sharing the process. sigh… LOVE!!!
I love it! Thanks so much for the tutorial, this gives me idea of how you conceive/achieve your awesome projects.
LOVE this artsy creation! Thanks so much for the wonderful tutorial!
one word…. WOW!
I LOVE how you showed your process here!! You need to do more posts like this!!! And an absolutely mindblowing card to boot!!
Wow! Amazing take on the challenge, your card is gorgeous and amazing in every way!! xo (And I’m a big fan of yours as well! )
)
Danielle
Super techniques, thanks for the details on this amazing card!