Jan 19
Hi-ya, friends! I asked you a couple of weeks ago, what you would like to see from me this year and a great deal of suggestions regarded the way I combine seemingly unrelated products to create a coherent collage - style card. I gave it a good thought and decided that the best way to explain the process will be a series of step-by-step photo tutorials, like the one I created HERE and which was met with quite an enthusiasm.
Frankly, I was battling with the idea of giving it a go at all, since the choices that determine the final look of my freestyle collage cards, are pretty chaotic & unpredictable. I go through a lot of stuff before I settle on the elements, fumble in my die cut, off-cut and whatnot baskets, but I never over-think the process. My work is largely based on intuition. Does it look fine? Yep, slap it on! 🙂
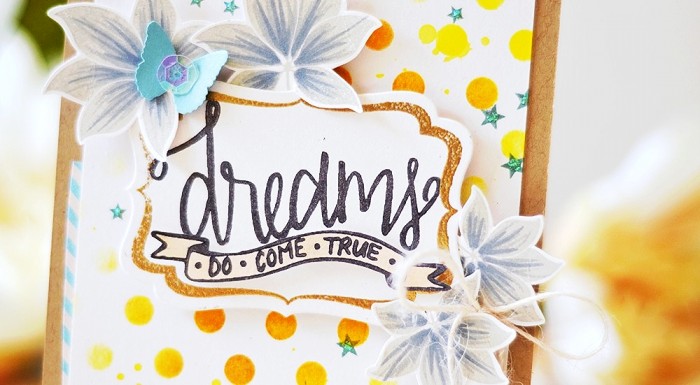
That being said, I hope that seeing how I build up my layers will help you open up more to possibilities yourselves. Here’s the card I’m sharing today!


I based it on the following challenges.
(click on the graphics for the hyperlink)


I decided to have a kraft card base with a layer of PTI Rustic White CS covering the front. I cut it smaller than the card and slightly narrower still, to account for extra bits which I wanted to tuck underneath the panel. I started by sponging Memento Luxe in Dandelion and Peanut Brittle through the Heidi Swapp Polka Dot stencil.

I flicked over some Marigold Glimmer Mist, to break up the regularity of the pattern.

Then I die cut the WPlus9 label (Label Layers 1 die) and gold embossed it using the corresponding stamp set (Filigreed Frames).

I stamped the sentiment from Neat & Tangled Dreams, in Memento Luxe Espresso Truffle. I stamped the banner separately, cut it out and mounted on dimensionals under the sentiment to match the stamp.

On a separate piece of CS, I stamped some leaves from WPlus9 Woodgrain Silhouettes Additions, in Provincial Gray Fresh Ink.

…fussy cut all of them, and added shading with Copic markers (C5 & C3).


I mounted the label on the panel and arranged the leaves around it, tucking the stalks underneath. I mounted all pieces on foam tape.

At this stage I decided to add further interest and an extra colour to the background, and stamped some stars from Simon Says Stamp Merry Trees set in a few places, with PTI Ocean Tides ink.

I took a scrap of stripe paper (Basic Grey Fact pad) and adhered it under the bottom left edge of the panel, leaving only a little bit of it to peek out.
For the finishing touches, I added a dot of glitter glue to the centers of the stars, a punched butterfly (Martha Stewart Classic Butterfly) topped with a pearlescent sequin, a May Arts Ivory twine and a light wash of E41 Copic to the banner.

Voila! Here’s the card again, I hope you enjoyed 🙂


This is a wonderful post an d a gorgeous card! I love your thought process! Especially love the addition of the stars and twine!
You are a genious! Love this card and your tutorila. I see how you “build” all the layers and keep adding. Just love it! Thanks
Beautiful! Love the step by step photos! You are so creative!
Thanks for the tut Chupa..I like seeing your process of layering vignette style..
This is so informative. Your cards always amaze me - its nice to see the process! How long does a card like this take you?
I love how you created those flowers. Truly awesome.
Thank you so much for sharing your steps. It really is nice [and helpful] to see your process. Love the coloring of those flowers also
*sigh* - gorgeous card, and thank you for sharing your wonderful process 🙂
Wonderful card Chupa - it’s great to see how you brought it all together, thanks! Rx
Lovely card. Thanks for the tutorial!!
Thank you, Rachel! It’s hard to tell as it strongly depends on how long I fumble in my stash to find the pieces I want. I’d say an hour and a half topmost but I never hurry, I like to indulge in the journey, lol.
Aww! Thank you so much for sharing the process! I love this post, and all of your cards!
That is excellent Chupa, thanks so much.
awesome card. love the step by step tutorial.
Oh, I love seeing how you put your cards together-such a great tutorial!
Thanks for the insight into your creative process. You have amazing design talents.
Beautiful! You are so creative! Love the step by step photos!
I’m one of your recent new subbies and am so glad I found you. I can’t remember which blog hop that led me to you. I love your style and just discovered this series which is so helpful. I adore collage-style layering, but it doesn’t come naturally to me. Thanks so much for your informative tutorials with the step-by-step photos and all the inspiration.