Feb 14

Anatomy of layers & happy Valentine’s Day!

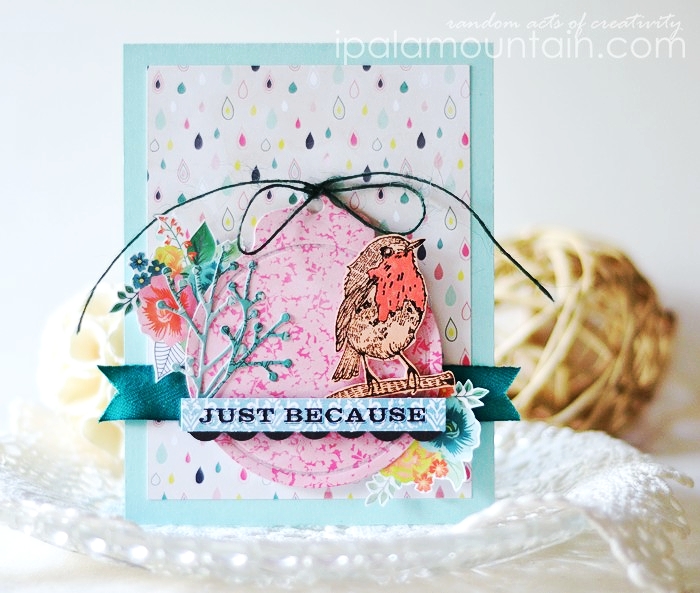
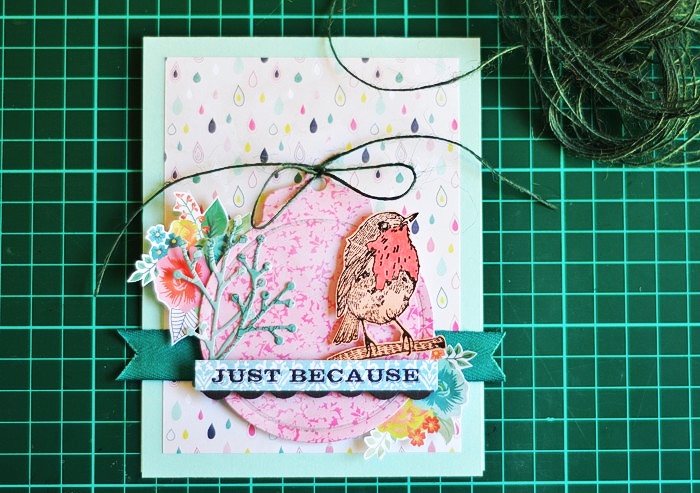
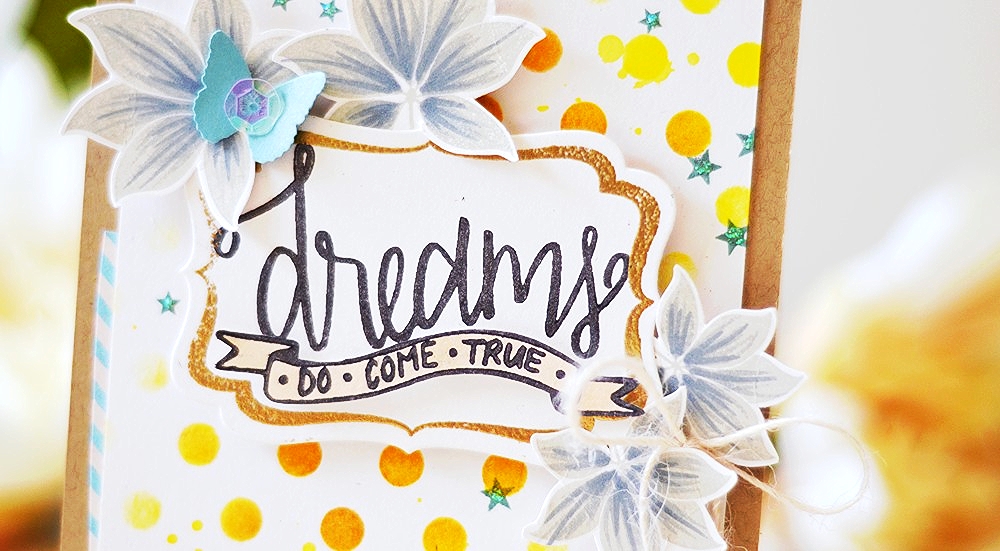
I’m a bit late to the party, I’ve been wanting to join in another one of the WPlus9 Anniversary challenges but kept running out of time. Especially that the current one is about adding dimension. Get out! Dimension and texture is what Chupa likes best. Since I knew I would indulge in layers, I took some step-by-step photos so that you guys can enjoy another Anatomy of Layers tutorial. Here’s the card, hope you’ll enjoy!

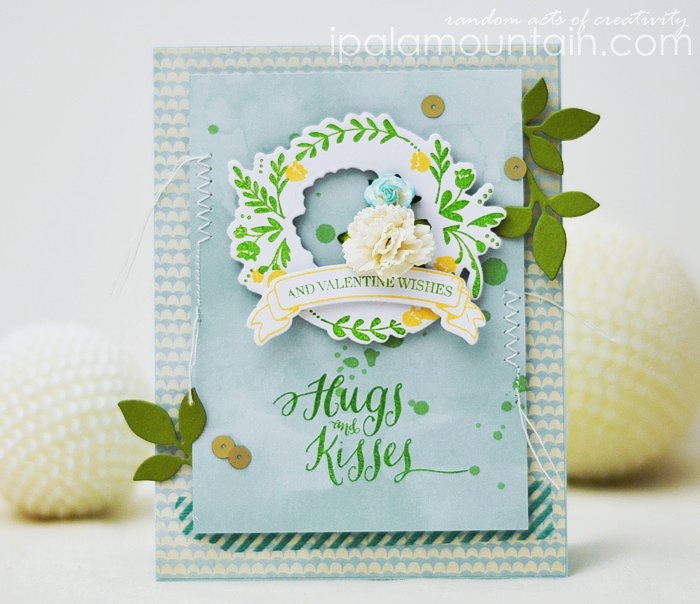
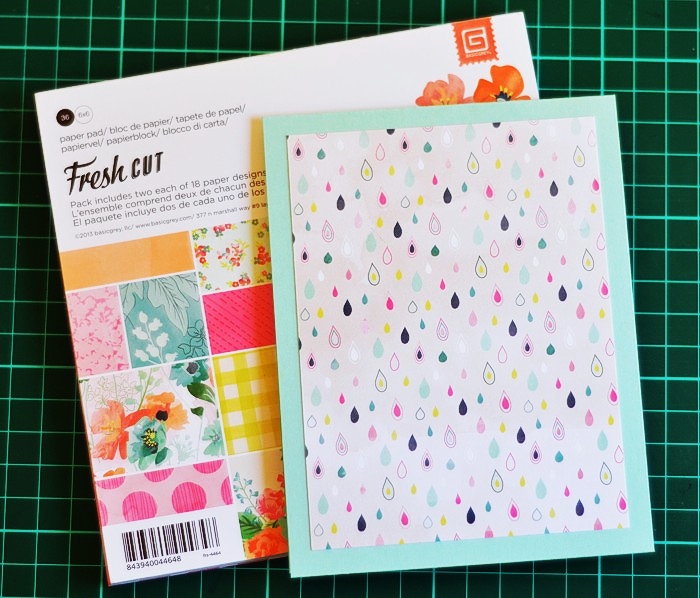
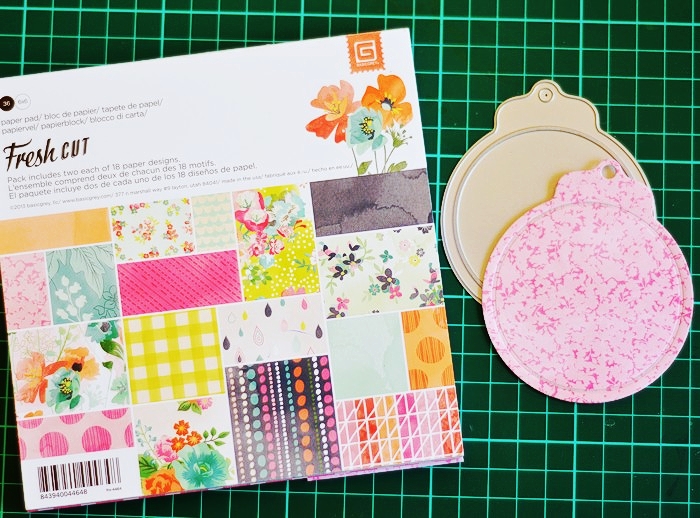
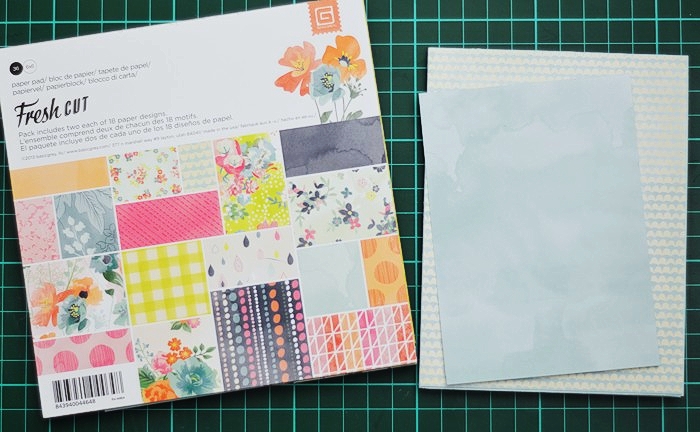
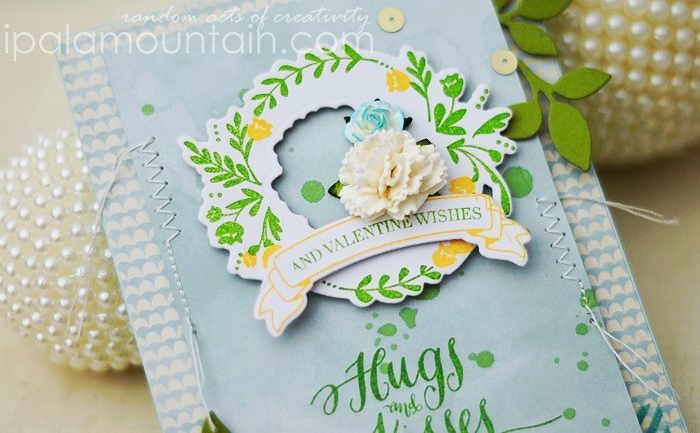
I began by covering the front of PTI Aqua Mist card, in the scallop paper from the Basic Grey Fresh Cut 6×6 pad. I also cut a panel (1 cm smaller from each side) from the aqua watercolour design.

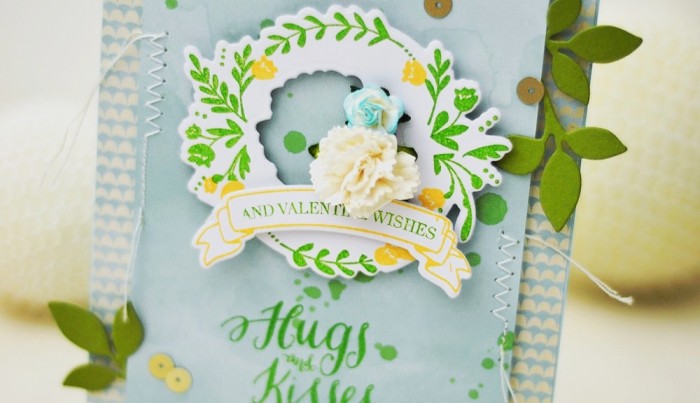
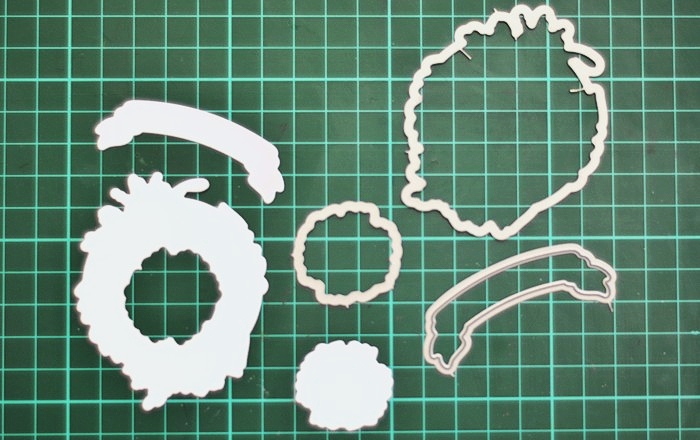
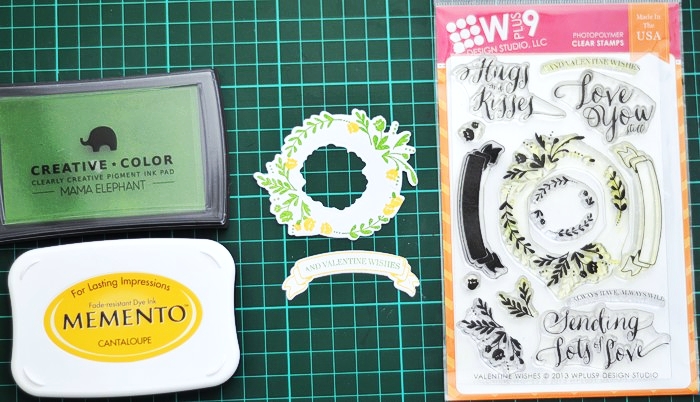
I cut the wreath and banner with WPlus9 Valentine Wishes dies, from white cardstock. Notice how I used the smaller wreath die to cut a hole inside the bigger wreath. It’s going beyond the intended purpose for that die but it totally works if you want some space cleared there :)

I stamped inside the die cuts, using the coordinating Valentine Wishes stamp set. I added a few more flowers in places.

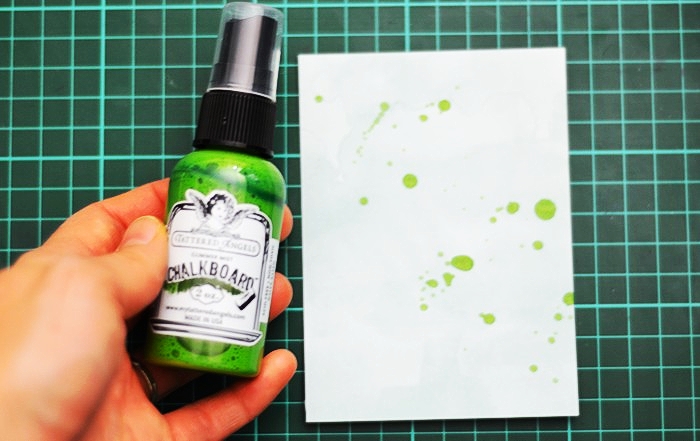
I flicked some Mantis Chalkboard mist, over the panel I preciously cut.

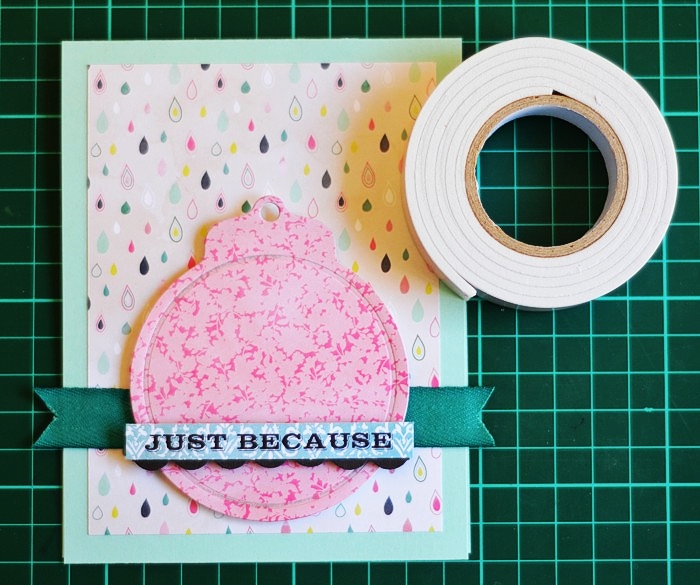
Stamped the sentiment…

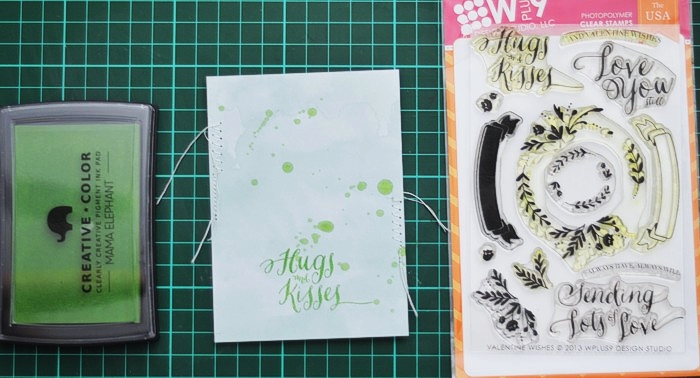
…and mounted the wreath + banner on the panel. I also machine stitched on both sides.

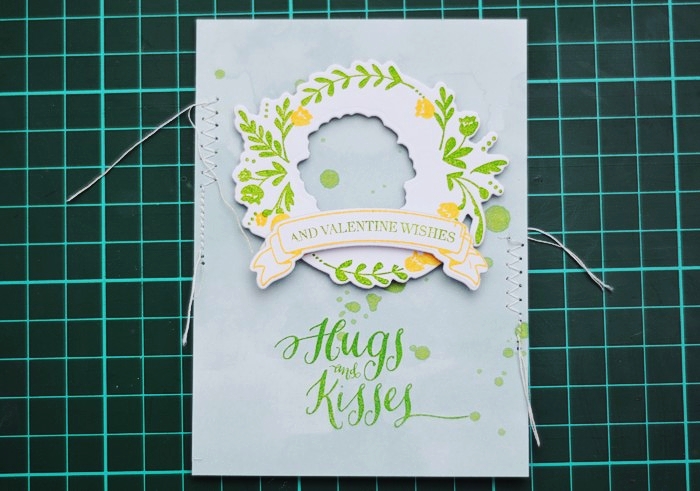
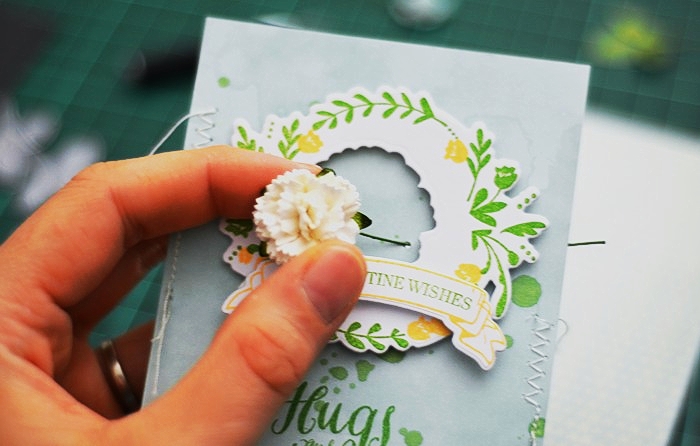
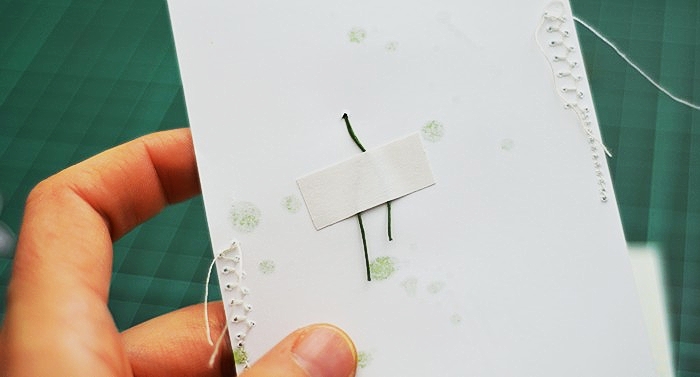
Next I added two mulberry flowers to the inside of the wreath. Those flowers come with a wire ‘stalk’ and instead of removing them, I always thread them through the paper, cut to desired length and secure of the other side with a piece of double-sided tape.

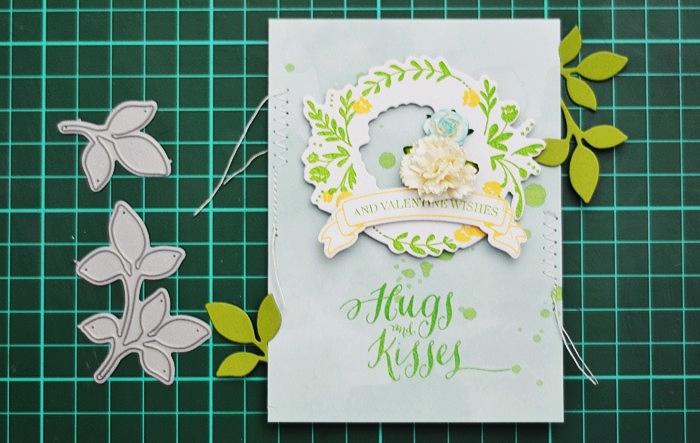
Once I was happy with the arrangement, I die cut two clusters of leaves with WPlus9 Folk Art Florals dies, and secured them at the back so that they’re peeking out from beneath the panel.

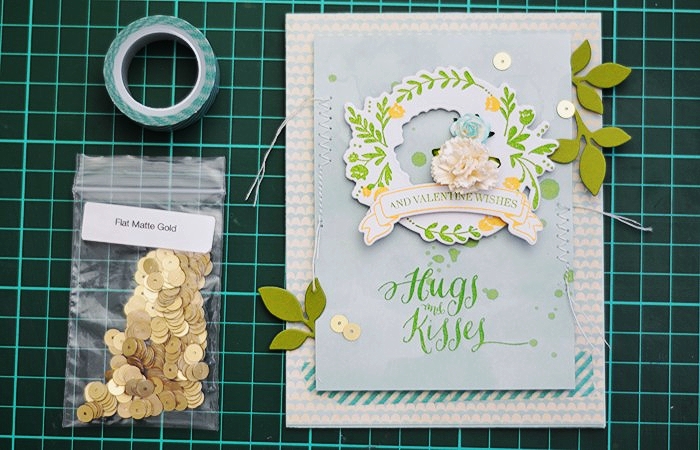
Finally, I adhered the panel to the card front and added finishing touches: a length of washi tape and gold sequins.

Here it is again :)


In other news:

A new challenge is up at StampNation and in honour of Valentine’s it’s all about RED! The Design Team’s takes are scrumptious.

We’ve got a sponsor this week (CTMH) and while the players have two weeks to enter if they want to win, our challenges never close!
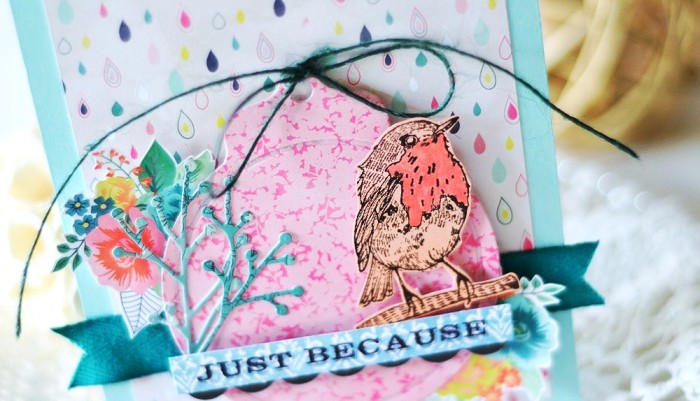
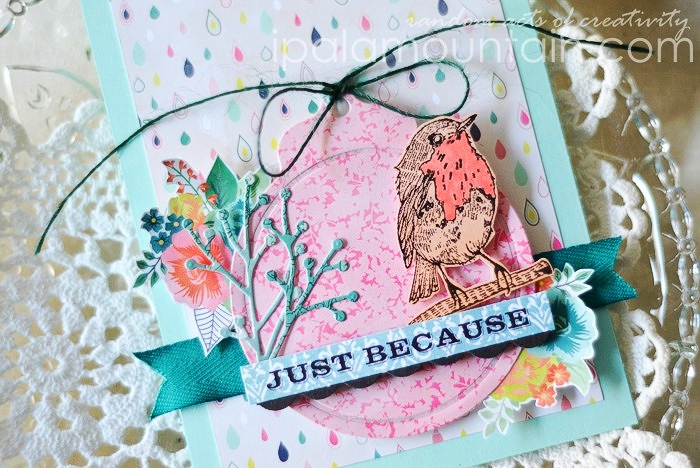
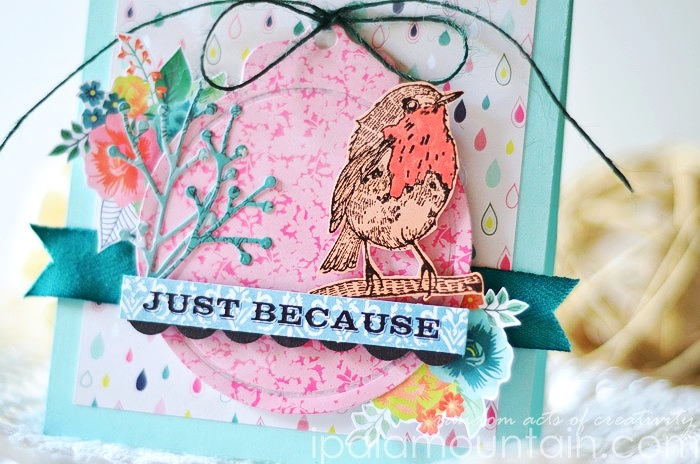
Here’s a better close-up of my card:

Don’t want to miss any of it? SING UP HERE!


Feb 04

Anatomy of layers - just because

As per hinting on Instagram, I’m sharing today a step-by-step tutorial for a new Anatomy of Layers! You can access the previous posts in this brand new feature HERE, and its predecessor HERE. I love my ‘scrappy’ (a.k.a. freestyle collage) cards and I hope that this series will give you an insight on what goes into them and how :)

Today’s card is a happy celebration of my new ‘toys’… Basic Grey‘s Fresh Cut paper pad with unique designs I adore (especially the paper i used for the background here) and the Hero Arts cutie of a stamp aptly called Bird.

ETA: I forgot to add that I followed the January Poppy Sketch at Laura’s blog! Ooops!

I started by covering the card base (PTI Aqua Mist) with aforementioned patterned paper. These colourful raindrops are SQUEAL - worthy.

Then I adhered a length of dark teal twill ribbon.

Cut a tag shape (PTI Tag Sale #4 die) from a different paper design…

…prepared the sentiment (taken from the Teresa Collins die cut sheet) and punched a scalloped border matching in length, from PTI Smokey Shadow CS.

I put all of those elements together on the card.

I stamped the bird with Memento Tuxedo Black, on another paper from the pad. Fussy cut it and added colour with R43 Copic marker.

I fussy cut two flower bouquets from the floral paper, then tucked them under the tag and added the bird.

I die cut and trimmed to desirable shape, a Penny Black Nature’s Song branch. I added it to the tag and next to the bird.

And finally I finished with a green twine bow.

That’s it! I hope you enjoyed :)


Feb 03

Stamped, sponged and Copic coloured background

So you know about my exclusive, bi-weekly video tutorials for StampNation, right? You might be interested to know that I just added a new one! Above is a sneak peek of what’s on offer and I assure you that it is in every bit just as fun as it looks like :)

My Technically Speaking forum is steadily growing and getting a lot of interaction. Not to mention that it’s just one of many sections of the Classroom, with different teachers and plenty more to learn from.

When you become a member today, you will have access to all this awesomeness and tons more:

  • almost 400 video tutorials
  • more than 25 lessons on Clean and Simple card design taught by my CASE Study buddy, Maureen
  • bimonthly trends articles by the awesomely talented Kristie
  • over 100 challenges
  • thousands of samples in the gallery.

I’d love for you to be a part of our fabulous, inspirational, growing community.

Subscribe now by by clicking here.


In other news:

  • stay tuned for a tutorial coming to my blog tomorrow, for my Anatomy of Layers feature
  • the current Sketchbook Saturday challenge is open for 5 more days, click to see the sketch
  • you have two days only to join us at CASE Study, for the last Donna - inspired challenge; see here for the details!
  • a new class called Basics & Beyond and taught by Catherine, Maureen and myself, is coming to you in a few short weeks! See the blinkie on the sidebar? Watch this space for more news on that soon :)
Jan 19

Anatomy of layers - dreams do come true

Hi-ya, friends! I asked you a couple of weeks ago, what you would like to see from me this year and a great deal of suggestions regarded the way I combine seemingly unrelated products to create a coherent collage - style card. I gave it a good thought and decided that the best way to explain the process will be a series of step-by-step photo tutorials, like the one I created HERE and which was met with quite an enthusiasm.

Frankly, I was battling with the idea of giving it a go at all, since the choices that determine the final look of my freestyle collage cards, are pretty chaotic & unpredictable. I go through a lot of stuff before I settle on the elements, fumble in my die cut, off-cut and whatnot baskets, but I never over-think the process. My work is largely based on intuition. Does it look fine? Yep, slap it on! :)
That being said, I hope that seeing how I build up my layers will help you open up more to possibilities yourselves. Here’s the card I’m sharing today!

I based it on the following challenges.
(click on the graphics for the hyperlink)

I almost always base my cards on a piece of inspiration, be it a current or past challenge or a Pinterest find. Sketches are my staple since they take the burden of figuring out the initial layout off me and help me visualize the general direction I want to go in. I love inspiration challenges like the WPlus9 Mood Board above as well, since they not only give me an option of colours but patterns, textures and/or style as well.

I decided to have a kraft card base with a layer of PTI Rustic White CS covering the front. I cut it smaller than the card and slightly narrower still, to account for extra bits which I wanted to tuck underneath the panel. I started by sponging Memento Luxe in Dandelion and Peanut Brittle through the Heidi Swapp Polka Dot stencil.

I flicked over some Marigold Glimmer Mist, to break up the regularity of the pattern.

Then I die cut the WPlus9 label (Label Layers 1 die) and gold embossed it using the corresponding stamp set (Filigreed Frames).

I stamped the sentiment from Neat & Tangled Dreams, in Memento Luxe Espresso Truffle. I stamped the banner separately, cut it out and mounted on dimensionals under the sentiment to match the stamp.

On a separate piece of CS, I stamped some leaves from WPlus9 Woodgrain Silhouettes Additions, in Provincial Gray Fresh Ink.

…fussy cut all of them, and added shading with Copic markers (C5 & C3).

I mounted the label on the panel and arranged the leaves around it, tucking the stalks underneath. I mounted all pieces on foam tape.

At this stage I decided to add further interest and an extra colour to the background, and stamped some stars from Simon Says Stamp Merry Trees set in a few places, with PTI Ocean Tides ink.

I took a scrap of stripe paper (Basic Grey Fact pad) and adhered it under the bottom left edge of the panel, leaving only a little bit of it to peek out.

For the finishing touches, I added a dot of glitter glue to the centers of the stars, a punched butterfly (Martha Stewart Classic Butterfly) topped with a pearlescent sequin, a May Arts Ivory twine and a light wash of E41 Copic to the banner.

Voila! Here’s the card again, I hope you enjoyed :)


Jan 03

Design Infused #5

Looking for my Season’s Givings Blog Hop and Giveaway? CLICKETY CLICK.

Hello 2014! I’m ready to conquer another year of blogging and excited to see what it brings to the plate. Thanks to your kind suggestions on the previous post, I now have better knowledge of what you’d like to see more from me and I’ll be addressing them as I go.
One of the things on my radar is being more specific about my design process and so I will be doing more tutorials, especially in video format. You would know already that I’ve been making baby steps in terms of video tutorials for StampNation but my aim is to bring some public content to my Youtube channel as well. It’s pretty bare as of today (unless you’re a StampNation member in which case you have access to exclusive content) but you’ll want to subscribe or bookmark it if you’d like to stay updated.

I’ve been wanting to do another Design Infused post but I’ve been otherwise wrapped up with different things. I’m back today with some cards, triggered by this piece of awesomeness.

What is Design Infused series about?
I take a design piece that inspires me (be it stationery, clothing, packaging, etc.), and translate it into a custom paper-craft design, using predominantly stamps and ink. Letting what I see around me influence my work is a big part of what I do and I want to show you how fun it is.
I collect the inspiration in my Pinterest board especially created for this purpose, and pick a piece from the lot for each installment of this feature.

And here’s how it happened:

The one layer card is made from off-white cardstock. I stamped one more piece of card, this time white. Trimmed it, enhanced with extra stamping (dark blue flower centers, stamp from the retired WPlus9 Poinsettia Patterns set) and mounted on off-white card.

Thanks for taking a peek, see you again in a few hours for a new sketch!


Jan 01

Season’s Givings Blog Hop

Welcome to the Season’s Givings blog hop! Put together by the awesome Latisha and featuring crème de la crème of the paper crafting society, is a way for all of us to say THANK YOU to our awesome readers, followers and lurkers :)
Each blogger in the hop is hosting a giveaway and most of us are also sharing something pretty along the way, so if you’re looking for spending the first hours of the New Year doing something awesome, this my friend, should be on top of your list!

Now, I’ll understand that you may not want to scramble through the whole of this humongous post to find out what’s on offer, so how about the good stuff first, hey?

————————————————————————————-

I’ll draw three winners from this post’s entrants.
1. First one will be the lucky recipient of this lot:

Here’s what’s included:
Glitz Design Teeny Alpha (x2) & Happy Travels Whatnot
October Afternoon Sidewalks mini album
Spellbinders Lotus Border Petites Borderabilities
Mama Elephant Modern Borders stamp set
Kaisercraft Periwinkle stamp set
Paper Smooches Cut Loose stamp
Simon Says Stamp Hey Pumpkin stamp set
Quietfire Design Warm Winter Wishes unmounted rubber stamp
Tsukineko Pear Memento Luxe and WPlus9 Lake House stamp pads

2. Two more winners will be selected, to receive a free 3-month membership to StampNation.

StampNation is one of the largest paper crafting communities on the ‘net. Members have access to everything that has ever been added to the site including:

  • almost 400 exclusive videos
  • more than 20 lessons on design in the Clean and Simple Classroom
  • over 100 challenges – that never close
  • almost 20,000 samples in the gallery
  • bi-monthly Spotlight on Trends articles
  • bi-monthly Technically Speaking video tutorials by yours truly!

and much more…

A brand new tutorial is live right now! I’m showing how to achieve a faux watercolour effect using spray mists. This tutorial is exclusive to the StampNation members.

What’s more, beginning January 11th, we’ll be starting our week long 3rd Birthday Celebration! Be sure to hang around whether you win the free membership or not, there’s a ton of great things coming your way!

————————————————————————————-

The three winners will be drawn randomly from all the entrants, and announced on Monday, the 6th. You have until 12.00 (midnight EST) on Sunday (5th) to enter. Please enter by linking your name to the InLinkz list below (this will be the list from which I will draw the names) and by leaving me a comment, telling me either:

a) what have you enjoyed seeing most on my blog in 2013
b) what would you like to see more from me in 2014!

————————————————————————————-

Now here comes the visual part… I mentioned something pretty at the beginning of the post, and here it is!
As an added bonus, I’d like to share a Thank You card, that I’m going to send to a randomly chosen person who “likes” Random Acts Of Creativity Facebook page :)
I will announce the winner on Monday, on the said page, so you may want to check it then, to see whether it was you!

Here’s the full list of the blog hop participants. If you arrived here without missing a bit, I love you so much 😀
Enjoy!

Lawn Fawn

Reverse Confetti

My Favorite Things Stamps

CAS-ual Friday Stamps

Fresh Squeezed Stamps

Julee Tillman: Verve Stamps

Avocado Arts Stamps

A Jillian Vance Design

Latisha Yoast

Amber Hight

Amber Kemp-Gerstel

Alice Wertz

Debbie Corbari

Vera Wirianta Yates

Lori McAree

Carolyn King

Sharon Harnist

Amy Tsuruta

Beth Pingry

Becky Oehlers

Angie Blom

Julia Stainton

Sharon Johnson

Michelle Woerner

Cindy Lawrence

Lori Tecler

Daniela Dobson

Savitri Wilder

Theresa Momber

Giovana Smith

Kimberly Crawford

Maria Levine

Colleen Schaan

Lydia Fiedler

Kelly Klapstein

Kim Kesti

Laura Williams

Shanna Vineyard

Jennifer Gallacher

Heather Pulvirenti

Stacey Schafer

Leigh Penner

AJ Otto

Teri Anderson

Julie Overby

Margie Higuchi

Jimmi Mayo

Tenia Nelson

Lee Ann Barrett

Iwona Palamountain <—- you are here

Kim Jackson

Linda Lucas

Sarah Gough

Dina Kowal

Elena Roussakis

Lisa Henke

Jodi Collins

Joanne Basile

Melanie Muenchinger

Darsie Bruno

Libby Hickson

Dana Joy

Jody Morrow

Heather Campbell

Savannah O’Gwynn

Lee Murphy

Lisa Arana

Jocelyn Olson

Isha Gupta

Piali Biswas

Ashley Harris

Bunny Vance

Anabelle O’Malley

Andrea Murdock

Stephanie Muzzulin

Alyssa Bennett

Christiana Reuling

Laurel Seabrook

Melody Rupple

Emily Branch

Megan Hoeppner

Related Posts Plugin for WordPress, Blogger...